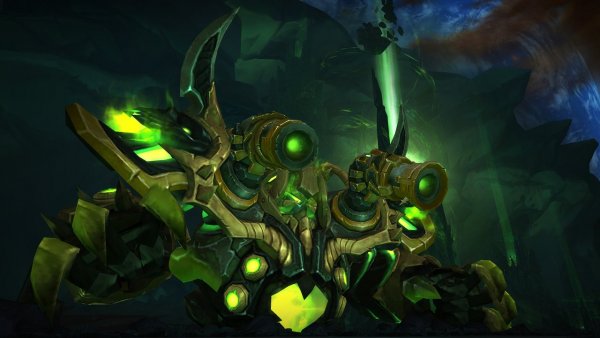
Background
Constructed deep within the core of Argus and outfitted with an arsenal of decimating worlds, this war machine has been designed for a single purpose: to bring the mortals´ invasion to its knees.
Overview
This fight has one phase in which you will fight a big boss that is standing on the outside of the platform.
It is the first boss of the raid and therefore the easiest one.
The boss has 2 cannons, one on each shoulder. Each cannon has a special ability, one does dmg that must be soaked, the other does damage that must be avoided.
When the boss reaches 60% and 30% health it needs to recharge the cannons and that’s the window for players to destroy one cannon each time (start with Annihilator at 60% and Decimator at 30%).
Other than that, it is a pretty straight forward fight:
- When tank swap, one tank runs away and will be bombarded, the other tank taunts.
- There are some raid aoe dmg that healers must handle
- Dodge (heroic) from fel when attacking cannons
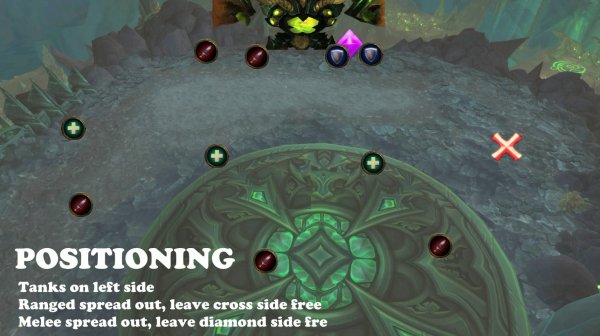
Positioning
Tanks
Tank on the right side of boss.
You need the right side of the platform clear when tank swap occurs.
Melee
Spread out around the boss and leave right side free for tanks.
When soaking, melee soak close to boss.
Ranged
Spread out around the platform and leave right side free for tanks.
When soaking, ranged focus on soaking the entire platform except close to boss (melee does that)
Boss abilities and tactics
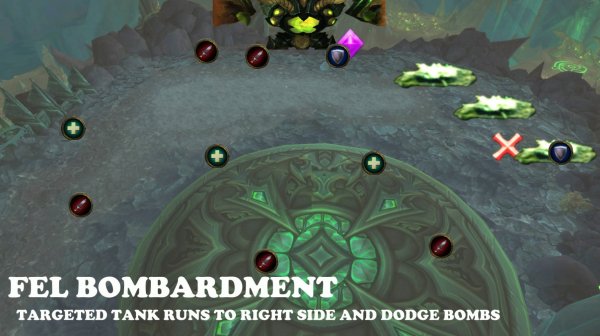
Fel Bombardment (tanks)
Boss targets main tank and ready to blast missiles.
After 4 seconds, the boss shoots (it takes an extra second before the first missile lands) missiles ever 1 sec for 5 sec on target location.
Getting hit does very high fire damage and a knockback.
Tactic: Fel Bombardment (tanks)
Tank on right side of the boss.
No one stands on the right side of the platform.
When targeted, run to the right side of the platform and keep running away until all 5 missiles are hit.
Tank swap every Fel Bombardment.
Searing Barrage
Boss shoots low/moderate fire damage to random players every 2 sec.
Number of players hit are based on raid size.
Tactic: Searing Barrage
Healers beware of constant raid damage and top players up.
The Cannons – Decimator and Annihilator
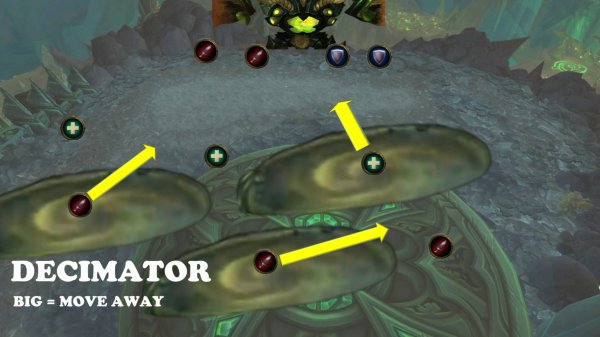
Decimator cannon shoots fel bombs at random play locations.
The impact is big 12y, you can see a big circle on the ground that shows the impact.
Getting hit does high fire damage.
The blast will also do low fire damage to all players.
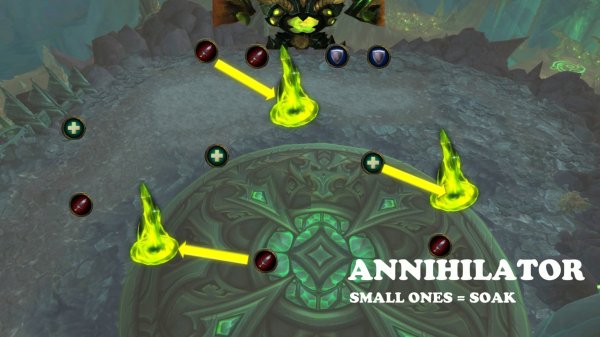
Annihilator cannon shoots Fel missiles on random locations on the platform.
If NOT soaked, it does high fire damage to all players.
If soaked, it does high fire damage to players soaking it.
Tactic: The Cannons – Decimator and Annihilator
Raid
Spread out so players can reach any location of the platform fast.
When Decimator (big circles on ground) à Move away
When Annihilator (small circles on ground) à one player stand on it and use defensive. When a player stands on it the fire image becomes a circle only, in this way you know that a player is soaking.
Apocalypse Drive
The boss will recharge his cannons when he reaches 60% and 30% health.
During this recharge he does raid dmg every 4 second.
On heroic, he shoots Surging fel through the platform. This does 4 mill dmg on player that is hit.
During this time, players can shoot the cannons.
If at least one cannon is not destroyed before boss is done charging it will do high deadly dmg on raid (wipe).
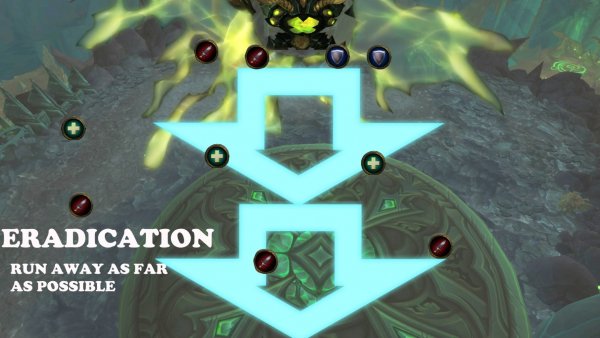
After boss has charged his cannon, he will do a big blast on the platform (Eradication).
This does very high (deadly) dmg but the dmg decreases the further players are from boss.
After each Apocalypse drive (boss charging his weapons), the boss will have 20% increased dmg done and this stacks (Empowered).
Tactic: Apocalypse Drive
At 60% : Use dps cooldowns and nuke and destroy the left cannon first (Annihilator cannon).
At 30% : Use dps cooldowns and nuke and destroy the right cannon (Decimator cannon).
Do NOT nuke both cannons, the other cannon will get full hp anyway. Single target and nuke one down.
Dodge the Surging fel (Heroic)
After destroying a cannon, and boss is done charging, run back and away from boss as far as possible and wait for the blast (Eradication), then run to positions again.
Healers beware of raid dmg all the time and top players up.
When to use Bloodlust/Timewarp/Heroism
At pull.
Other posts
- The BEST Midnight Season 1 DPS Tier List Guide
- Midnight Pre-Patch Event Guide: Twilight Ascension Rewards, Rare Timers, and Collectibles
- Endeavor: A Deeper Dive Into WoW’s Expansive New System
- LOADS of Extra Decors You Did NOT Know About!
- World of Warcraft Players Score Exclusive Housing Decor with Diablo 4: Lord of Hatred Pre-Order
- Brawler´s Guild 2025 GUIDE
- Legion Remix Decor will be available after Legion Remix
- Professions Unpacked: Your Guide to Crafting Housing Decor with Reagents from Every Era
- WoW Housing: Best Tips Guide
- Everything Coming in World of Warcraft Patch 11.2.5
