OVERVIEW
- FAST TACTICS -
- You will fight boss that spawns an add several times during the entire fight.
- Off tank on add and tank swap every time add spawns or dies.
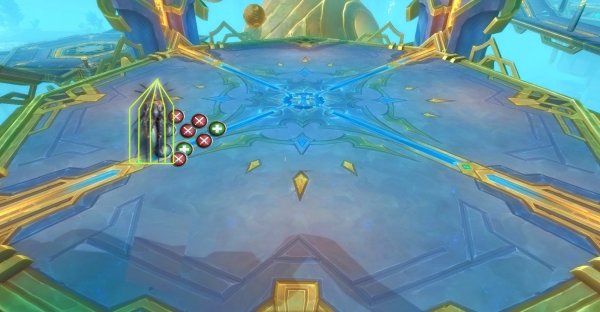
- Take add to the edge of the platform because it makes the tank drop a set of 3 pools continuously. Tank boss on add.
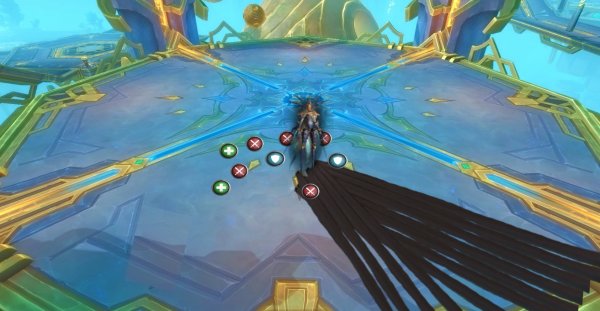
- Stand close to boss to easier dodge the cone dmg she does on random location.
- Two players stands on the line when a player is marked with an arrow to share dmg.
Heroic mode – leaves a debuff so have a soak rotation. - There are 4 pillars. When boss has 0 mana it will drain a pillar. During this time she has a shield on her that must be broken fast. Healers must use healing cooldowns for the heavy raid dmg.
- Drained pillars will be activated by boss to shoot out a dark wave that passes through the entire platform. You start with 1 already drained pillar at pull.
- When a wave passes through you, you will take dmg and a debuff that makes you take increased dmg from wave. Make sure that the debuff is gone before the next wave passes through you.
Mages can blink through the wave without taking dmg/debuff.
Night Fae can use covenant blink through the wave without taking dmg/debuff. - When there are 2-4 drained pillars, the boss will activate them after each other in different orders. Check out tactics below. You can also see wave order by looking at the dark orbs she shoots at the pillars. The fastest orb will hit first and you can see the speed of which one will hit second etc.
POSITIONING & MARKERS
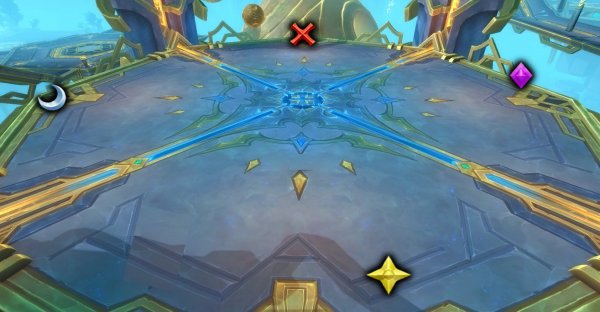
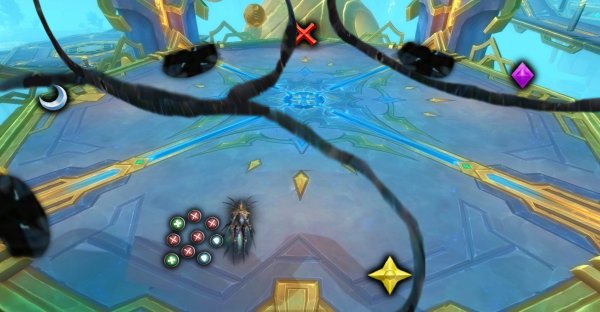
- Put a moon marker on bottom left corner.
- Put a star marker on bottom right corner.
- Put a cross marker on top left corner.
- Put a diamond marker on top right corner.
POSITIONING
Pillar 1 active
Wave set 1 & 2) Raid stands on the bottom left corner (moon marker).
Pillar 2 active
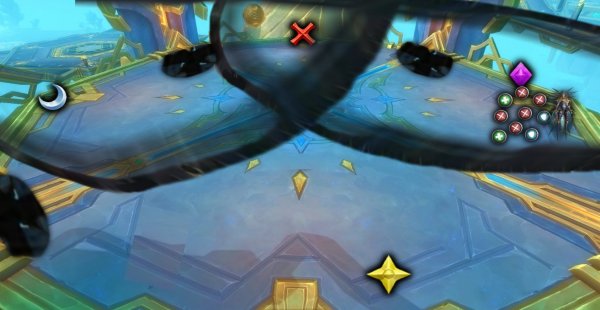
Wave set 1 & 2) Entire raid stands on the top right corner (diamond marker).
Pillar 3 active
Entire raid stands in center an be ready to run to a marker based on which pillar will shoot out waves.
Pillar 4 active
Entire raid stands in center an be ready to run to a marker based on which pillar will shoot out waves.
BOSS ABILITIES & TACTICS
The Rings – Disintegration Halo
In general
- There are 4 pillars. When boss has 0 mana it will drain a pillar. During this time, she has a shield on her that must be broken fast. Healers must use healing cooldowns for the heavy raid dmg.
- Drained pillars will be activated by boss to shoot out a dark wave that passes through the entire platform. You start with 1 already drained pillar at pull.
- When a wave passes through you, you will take dmg and a debuff that makes you take 500% increased dmg from wave. Make sure that the debuff is gone before the next wave passes through you.
LFR MODE - debuff lasts for 5 sec
NORMAL MODE – debuff lasts for 5 sec
HEROIC MODE - debuff lasts for 6 sec
MYTHIC MODE - debuff lasts for 6 sec
Mages can blink through the wave without taking dmg/debuff.
Night Fae can use covenant blink through the wave without taking dmg/debuff. - When there are 2-4 drained pillars, the boss will activate them after each other in different orders. Check out tactics below. You can also see wave order by looking at the dark orbs she shoots at the pillars. The fastest orb will hit first and you can see the speed of which one will hit second etc.
- The fight starts with one wave.
Then it will have two waves from different directions of the platform.
Then will have three waves from different directions of the platform.
Then will have four waves from different directions of the platform.
How it works & Tactics
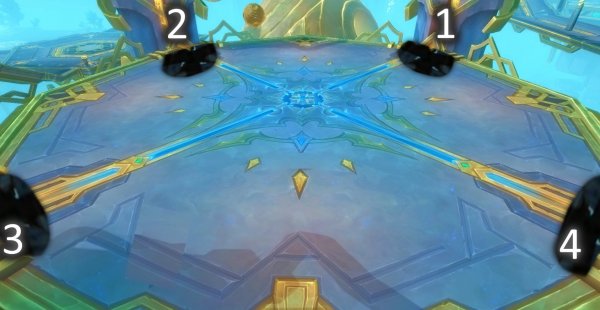
There are 4 pillars on around the platform.
When boss has 0 mana it will go to a pillar and drain it.
Top pillar is drained before pull.
Second pillar is the left one.
Third pillar is the bottom one.
Fourth pillar is the right one.
When it is drained that pillar is charged and ready to shoot out a dark wave and that happens when Boss sends a dark orb on it.
One dark orb is the fastest and reaches a pillar before the other orb. Meaning, you will get dark waves after each other, not at the same time.
In total there are two waves from each pillar before boss starts draining the next one.
Positioning to not die
PILLAR ONE DRAINED
This pillar is drained before pull.
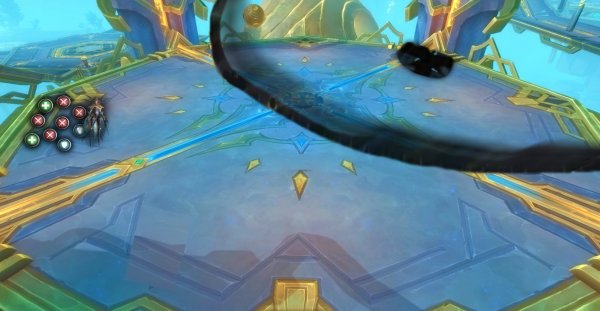
Boss sends an orb to it and a dark wave comes out and passes the through the platform.
At start of the fight, the entire raid stands on the bottom left corner (because you will get dark pools on the ground during the fight, and this is the only corner that you don’t need to stand on during the fight). (Moon marker)
After 2 waves, the boss will have almost 0 mana and teleports to the second pillar to drain it.
PILLAR TWO DRAINED
Wave order is:
First set of waves
- Pillar 1
- Pillar 2
Second set of waves
- Pillar 1
- Pillar 2
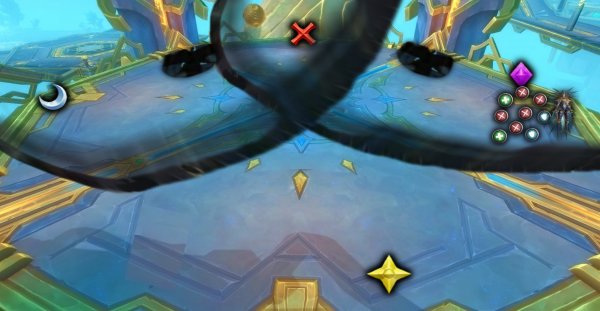
After it is drained, the entire raid stands on the top right corner (diamond marker).
Boss will send an orb to each pillar.
The top pillar (pillar 1) gets hit first and it sends a dark wave. Run through it fast.
The left pillar (pillar 2) wave will come closer now, so make sure your debuff is gone before passing through the second wave.
This happens two times before third pillar.
PILLAR THREE DRAINED
Boss teleports to the third pillar to drain it.
The entire raid stands on center to check if pillar 3 or pillar 1 will get hit first by the orb that boss shoots. The orb that moves the fastest is the one that will start.
Before second set of waves, the entire raid stands on center to check if pillar 3 or pillar 1 will get hit first by the orb that boss shoots. The orb that moves the fastest is the one that will start.
The order will either be pillar 3, 2, 1 or pillar 1, 2, 3.
When the Wave order is
- Pillar 3
- Pillar 2
- Pillar 1
The entire raid stands on bottom right corner (Star marker)
When the Wave order is
- Pillar 1
- Pillar 2
- Pillar 3
- top right corner (Diamond marker).
PILLAR FOUR DRAINED
Boss teleports to the fourth pillar to drain it.
The entire raid stands on center to check if pillar 4 or pillar 1 will get hit first by the orb that boss shoots. The orb that moves the fastest is the one that will start.
Before second set of waves, the entire raid stands on center to check if pillar 4 or pillar 1 will get hit first by the orb that boss shoots. The orb that moves the fastest is the one that will start.
The order will either be pillar 4, 3, 2, 1 or pillar 1, 2, 3, 4.
When the Wave order is 4, 3, 2, 1
- Run to Diamond.
- Pillar 4
- Pillar 3
- RUN to star after pillar 3 wave hits you.
- Pillar 2
- Pillar 1
When the Wave order is
- Run to star
- Pillar 1
- Pillar 2
RUN to moon after pillar 4 wave hits you - Pillar 3
- Pillar 4
THE ADD – Domination Core
The boss spawns this add several times during the entire fight.
It has two abilities:
- Encroaching Dominion
Shoots main target with moderate Shadow damage.
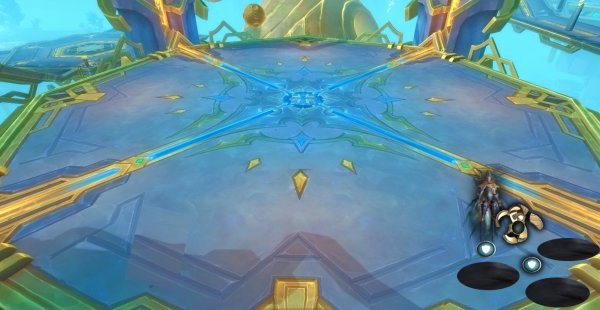
This leaves 3 pools around that player.
Stepping on a pool does shadow dmg every 1.5 sec.
NORMAL MODE - The pools last for 1 min.
HEROIC MODE – The pools last for 2 min
MYTHIC MODE – The pools last for 2 min
- Dominating Bolt
Shoots Shadow dmg at main target.
TACTICS – THE ADD
- This add must be tanked by off tank.
- The tank takes the add to the edge of the corner and pisiton yourself so that the 3 pools are dropped on the edge of the platform.
- All dps full nuke the add every time.
- Interrupt the add.
- Melee beware and stand behind the add.
- Main tank, bring the boss to the add for cleave dmg on boss.
THE BOSS
Staggering Barrage
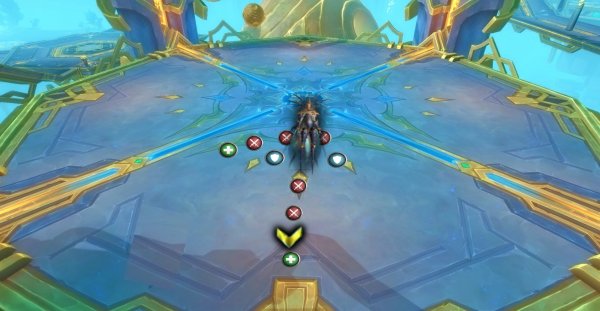
- Boss targets a player by placing an arrow on the player.
- There is a line between boss and the targeted player.
- The boss will then shoot that player with 3 orb.
- The orbs do very high dmg.
- This dmg can be shared.
- HEROIC MODE
Players hit by the orbs will get a debuff that makes them take 500% increase dmg from these orbs. The debuff lasts for 45 sec.
Tactics: Staggering Barrage
- 2-3 players stands on the line to share the dmg.
- HEROIC MODE
Two players must stand on the line to share the dmg.
Healers beware.
Rotate who stands on the line since the same player can´t stand on the line within the debuff timer.
Obliteration Arc
- Boss turns to a random direction and shoots out a cone.
- Players hit takes high shadow dmg.
Tactics: Obliteration Arc
- Stand closer to boss so it goes faster to move away from it.
- This goes fast so beware and use movement speed abilities when needed to dodge it.
Infused Strikes
- Boss hits the tank that leaves a stacking debuff.
- Debuff does low Cosmic dmg every 1 sec for 20 sec.
- When debuff expires it explodes and does Cosmic dmg to all players. The number of stacks increase the dmg the raid takes.
Tactics: Infused Strikes
- Tank swap based on when the add spawns and then add is dead.
- Healers beware.
Siphon Reservoir & Inevitable Dominion
- When boss reaches 0 mana she will teleport to the next pillar and drain energy.
- The boss has a shield around her during this time.
This shield absorbs 3% of her maximum health. - The boss does moderate shadow damage every 1 sec to all players while in the shield.
- When the shield breaks,she takes 1% of her health every 1 sec for 10 sec.
Tactics: Siphon Reservoir & Inevitable Dominion
- Stack up behind boss.
- Full nuke the boss to break the shield fast.
- Have healing cooldown rotations for each pillar.
- Have raid defensives cooldown rotations for each pillar.
Total Dominion
When all pillars are drained and boss reaches 0 mana, she will do high dmg to all players every 1 sec and send several waves from each pillar.
Tactics: Total Dominion
- This is the enrage timer. Kill boss before she kills you.
Other posts
- Playerhousing WoW: How to Get All Decorations for your House
- HUGE CHANGE due to Feedback: Cartel Chips increased
- Turbo Boost Your Adventure: Kick The War Within Season 2 Starting May 13!
- 11.1.5 Nightfall Invasion - Daily Quests
- 11.1.5 Nightfall Scenario FULL Detailed GUIDE
- New Renown: Flame´s Radiance - Showcase ALL REWARDS
- FULL GUIDE on How to get all Nightfall Invasion Transmog Sets & Weapons
- In-Depth Reputation Farming Guide for Flame's Radiance Renown
- Nightfall Invasion - Daily Rares
- STUFF YOU KNOW & DON't KNOW ABOUT THE NIGHTFALL INVASION
